
Do you want to start a productive micro farm that will provide for you and your family for years to come? This guide is for you.
Setting up a micro farm seems easy enough, right? Look at a few videos on YouTube, plant an epic market garden, get a chicken tractor, and voila! You have a micro farm.
Except, as a micro farmer myself, I know exactly how that story can end. Imagine this:
After preparing the garden beds, building animal housing, tending to crops for weeks, and facing terrible weather to ensure your animals are safe and fed, your crops fail, your animals die, and you are unable to satisfy your customers for months, as you recover. It’s horrifying!
So how do you avoid some of these pitfalls and create something great? Something that can provide you and your family with nutritious food and satisfied customers for years to come?
Let me show you how to start a micro farm in 12 simple steps. I’ll take you from idea to launch. Throughout this article, I’ll also share some tips and tricks that will save you time and energy.
However, there is one thing we need to get clear before diving into the steps.
What Do We Really Mean By “Micro Farm”?
The term Micro Farm is relative to the country or state in which it operates. Some people might consider ten acres as small, while in some places, that’s average size or even large.
However, most people agree that a Micro Farm is a small-scale, commercial food production business, which operates on less than five acres of land. Its total income can be as little as $1,000 to more than $100,000 per year. In some countries, you must meet a minimum income requirement to remain classified as a farm.
For that reason, you need to keep in mind that this is a business. Here’s how to start a Micro Farm based on our experience with our projects.

Tip: If you only want to produce food for your family, please read our beginner's guide: How to Create A Syntropic Garden.

However, if you intend to generate an income, then read through the article step-by-step.
Step 1: Write Down Your Ideas
Do you have a lot of ideas floating around your head? Great! Write all of them down. Don’t worry if they may seem far-fetched. Those are usually the best ones.
If you go blank at this point, then here are some things you can do to get inspired.
- Look at some farming videos on YouTube – Chances are this is where you caught the bug in the first place. Look at some farm and garden tours.
- Search for small farm ideas on Google images – Of course, you are aware that you will not have anything close soon, but you just want to get those creative juices flowing.
- Discuss your ideas with a friend – Write down the ideas and feedback from the session. These may be the seeds of your ultimate vision.
- Join an active farming group – Look at the projects and queries that the members are posting.
By this time you should have some ideas. You may even have a few that are too futuristic. That’s great! You can work towards that over time.
Now, write a short description of your ultimate micro-farm. What type of farm would you build if money was not an issue?
- Where would it be located?
- How many acres would it occupy?
- What would you grow on it?
- What type of animals would you have?
- How much money would you make per year?
- What type of technology would you use on it?
Whew! That was an exercise! Are you excited as yet? Great!
Let’s move on to the next step.
Tip: Give yourself a deadline to finish this step. Your idea does not have to be perfect nor seem realistic. You just need to put your thoughts on paper.
Step 2: Get To Know Your Potential Customers
Do not skip this step! The success of your micro farm venture depends on your ability to meet the needs of your customers.
In this step, you have to do some research. Find out what your ideal customers want and the price of similar products.
The last thing you need is a bountiful harvest and no sales.
Visit local shops, Farmer’s markets, and supermarkets. Visit local online marketplaces. Talk to your friends and neighbors.
At this point, you are looking to confirm the following:
- Are people buying what I plan to produce? If not, what are they buying?
- What is the average price of items?
- Which businesses can I work with directly? E.g Restaurants, Cafés, Diners, Hotels, etc.
- Where can I sell my products directly to customers? Would I need permits to sell at these venues?
After this exercise, you should update your original idea based on the information.
Now it’s time to find out who else is producing the same products. You have to be realistic. Anyone who is growing or providing access to similar products can affect your sales.
Here is a short list to get you started:
- Other Farmers
- Vendors
- Shops
- Supermarkets
- Neighbors
- Online Stores
- Government Policies
- Customers & Friends
I included the last two since they blindsided me. You can have a loyal customer decide to grow their food or support a friend who is now doing the same. Keep this in mind.
At this point, you may decide whether it would make more sense to supply directly to customers or other businesses.
Tip: I like to supply a small group directly. These are regular customers who refer others to me. Then I supply restaurants and small food services businesses.
Step 3: Choose Your Farming Method
Now that you know what to grow and who your target customers are, you need to decide how you’re going to grow your food.
Will you be choosing the organic or the conventional route?
In practice, most micro farmers provide first and foremost for their families.
Ideally, you will produce food that is worthy of feeding your family. Some people choose to continue using conventional techniques responsibly, while others prefer a more natural approach.
However, do not get trapped in the debate of ideologies or ethics. What is important is that you make an informed decision.
Research both techniques, then choose the one that suits you best.
- What are the advantages and disadvantages?
- Will you be able to get the necessary inputs?
- What are the criteria to become certified?
Remember, this is a long game. You can refine your technique over time. So do not make too much of a fuss. What is most important is that you get started.
When I started, I was excited about using organic, no-dig methods to create an eco-friendly farm. However, I did not have access to bulk compost or wood chips. I had to produce enough compost to cover the planting area each month. That was a task!
Long story short, you know your situation, resources, and abilities better than anyone. Take the advice of others into consideration, but ultimately decide on which route suits you best.
Tip: Please visit the organic certification website to get additional information on the process.
Step 4: Design Your Micro Farm Prototype
It’s time to get creative! Let’s design your prototype! You can design a downsized model of your farm, which you can use to practice. However, you can also create individual modules as I did.
Will you be drawing the layout for a poultry farm or a fish farm? Will it be for vegetables or mushrooms?
I get excited at this point, and I know you will too. Here, you get the first visual of your idea. Keep it simple and make a quick sketch on paper. Feel free to get fancy and use a design app.
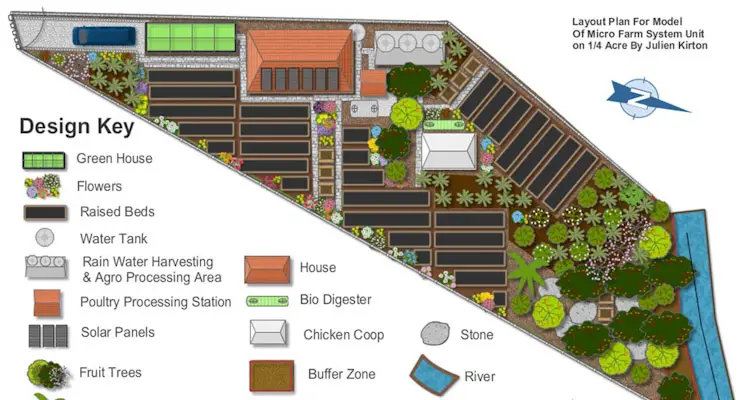
In my case, I had to design a plan to pitch to investors. I used a garden planner to draw my concept. It took me about a week! You don’t need this at the moment. You will get the chance to do this later.
I must emphasize that you do not get carried away at this point. Keep it simple. This list will come in handy in the next step.
Tip: I call this a prototype so that you will not get attached to the system you create. As you gather additional information, you most likely will make considerable changes to the design.
Step 5: Write Your Startup Summary (Finance Summary)
It’s time to figure out how much this will cost. Here is a hint, it’s never as low as you’d wish and always a lot more than you’d like.
Use your design as a guide. Make a list of all the materials and equipment you’ll need to get started. Write the cost of each item.
Don’t let the numbers overwhelm you in this step. Just write them down.
Your list can include the following.
- Lumber
- Power tools
- Garden tools
- Land
- Vehicles
- Growing media
- Processing units
- Computer and software
- Legal fees
- Construction Fees
- Irrigation System
- Chicken Coop
- Greenhouse
- Etc
Don’t worry if you already own them. If you need it, list it.
Next, you need to indicate where you intend to get the money to purchase these items.
- Your capital
- Grants
- Bank loans
- Other financing.
Here is an example of costs for the prototype. We had to write the summary for the entire project. As a result, the numbers are a bit high. However, you can get the picture.
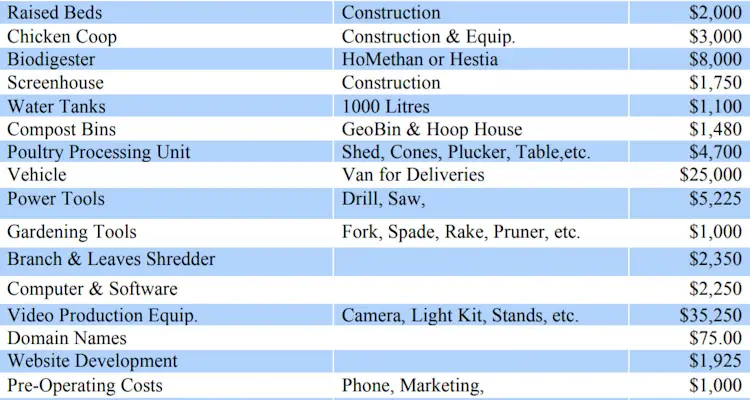
Tip: Don't get overwhelmed by the number. Remember, you are not going to jump into the deep end. We are working on the prototype system to prove the concept before committing to huge sums.
Step 6: Create A One Page Lean Canvas
I’m not going to waste your time and ask you to write a business plan, now; not the lengthy version at least.
Instead, you are going to use the information, which you have gathered so far to create a Lean Canvas.
A lean canvas is more or less a concise one-page overview of the business.
In the case of your farm, it will outline details about your products and customers: their problems, and your solution.
During this process, use the research data you have gathered so far to fill in the canvas.
Here is an example:
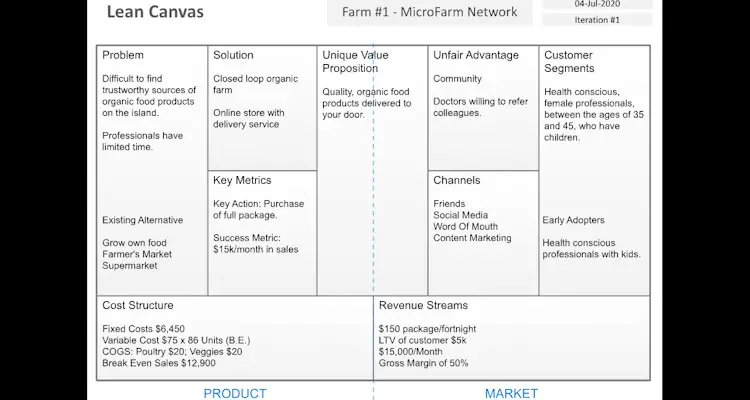
Make a copy of the lean canvas. Complete it using the instructions included.
This exercise is a time saver! It is not a replacement for a traditional business. However, it allows you to refine your idea even further.
Tip: Click Here to download a copy of the lean canvas.
Step 7: Research Necessary Licence And Permit
Now we have reached the ultimate refinement point. Here you’ll need to find out just how big you can go with your prototype or micro-farm.
Until this point, you have not spent much money. Before you do, you’ll need to find out if you can go ahead where you are or if you’ll need to find another location.
In some instances, you will be free to conduct limited farm activities.
For example, in some suburban areas, you can rear up to 50 chickens in your backyard. However, roosters are not allowed.
In my case, I live in a somewhat rural village. As a result, I am free to use up as much of the land as I wish. However, I must leave a buffer zone between the farm and the river.
I also cannot rear pigs due to how close my property is to the river and the possibility of contamination.
I needed to register and receive periodic visits from extension officers to ensure I keep up to code.
These policies vary from country to country. Contact your local agriculture agency for information that applies to your area.
While it might be tempting to ignore this step, there are some advantages to receiving these permits.
As a registered farm, it is possible to receive grant funding, concessions, and other assistance provided by organizations worldwide. Some of these opportunities are not published but will be brought to your attention by an extension officer or someone else within the agencies.
Tip: Ensure you maintain a friendly but professional relationship with your extension officers.
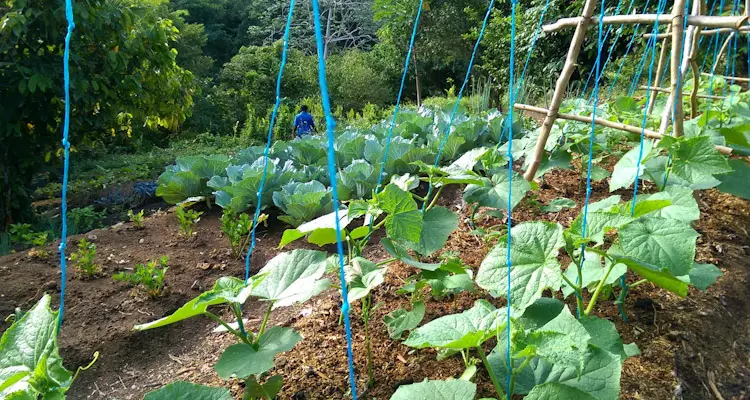
Step 8: Build A Scaled Prototype Of Your Farm
If you are already involved in food production, you might already have the experience necessary to skip this step. However, it is beneficial to create a scaled-down version of your ideal micro-farm. It can be as little as a thousand square feet up to an acre.
You want the prototype to be small enough to be manageable but large enough to get the necessary experience and feedback.
Even if you have all the funds to get started, you need to ensure that there is a need for your products and that you have a firm grasp of the process.
If your goal is to provide food for your family and friends, you already have confirmation of the need for your product.
However, I would still encourage you to start by building a small-scale prototype and gradually increase it when needed.
It will provide you with the experience to scale up as you wish later. It will also allow you to find what works for you.
At this point, you will also get a more realistic expectation about your project. You will learn what it takes to manage your farm daily.
You will need to learn how to schedule your work and develop the discipline necessary to keep doing daily mundane tasks, even when you don’t feel like it.
The momentum you gain here is critical when approaching financial institutions and potential investors. Most organizations will give grants to expand an active project, but seldom to start that project from scratch. They prefer that you have skin in the game.
Tip: Make a note of all processes and procedures as you build your farm. You can later use this to create an operations manual to train employees.
Step 9: Write Your Business Plan
You’ve made it this far! That means you are serious about turning your passion into a business. Now it’s time to make it official with a formal business plan.
I have a surprise for you. If you had followed the steps until this point, you already have most of the information and experience needed to write an effective business plan.
However, you are only going to create the first draft until you have registered your business.
At this point, I would suggest that you contact a small business development agency in your area.
I know you can simply get a template online and fill it out.
However, it’s more than simply a matter of filling out the form.
You are looking to build as many relationships as possible at this point.
These agencies provide information, training, and access to various financing opportunities. I received my seed grant to start my micro-farm through one such agency.
In some instances, they offer discounts on promotional materials and services you will need as you grow the business aspect of your micro-farm.
Tips: Visit a small business development agency in your area. Find out about their services. You might be amazed at what they have to offer at little to no cost.
Step 10: Register Your Business
I’m sure you already have some business name ideas. However, you need to confirm that this name is available both locally and online.
You can go through the process of researching trademarks or seek legal advice if you wish. However, don’t forget the connections you made in step 9.
Most local small business development agencies will have the information necessary to streamline this process.
They can save you from months of guesswork.
Some agencies will handle most of the paperwork for you for a small fee. Then refer you to a lawyer who will complete the process.
For instance, I was required, by law, to register my business name to operate my farm. I then had to submit my documents to Social Security and Inland Revenue.
This process took less than a month but keeps me compliant.
I will have to upgrade to an LLC as the farm grows for additional protection and tax benefits.
Tip: Try to secure your domain name as soon as possible. You should also reserve that name on social media and online platforms where you intend to promote your MicroFarm.
Step 11: Find Grants Or Secure Financing
With your business registered, your business plan finalized, and your prototype gaining traction, you are now in a position to seek financing.
Here is a harsh reality, most financial institutions are hesitant to provide financing to farmers and agricultural ventures. This is partially due to the unpredictable nature of the business.
As a result, your best bet is to either self-finance or grant financing. Keep in mind that grants usually have conditions attached to them.
Chances are you will be using your savings initially, but please do not go into unnecessary debt at this point. It is better to bootstrap your way and grow organically than to have debt hanging over your head.
Each year, there are various grants allocated to agriculture, climate change, and green technology. In most cases, active micro-farm projects can qualify with some minor adjustments to their business plan.
For example:
- You might need to add an aquaponics section to your design to qualify for a water conservation grant, which allows you to purchase additional water storage.
- You may add a solar power walk-in storage unit to qualify for a Green Energy loan.

There are many opportunities that you can use to develop your farm along the way. However, some might require a few years of operation to qualify.
It is a long game. These organizations are accountable to their governments or even parent companies. They need to prove that this grant money is making a difference.
Tip: Always be on the lookout for opportunities. In many cases, these programs are simply waiting, and the money goes unused for years.

Your local business development agency can be a big help, but in some cases, it helps to search for this information on your state's or government websites. You might be amazed by the gems hidden there in plain sight.

In case you're wondering, this is how we got additional funding and continue to look for opportunities as the project develops.
Step 12: Start Your Micro Farm
You did it! You have what you need to start your micro-farm. To an extent, you have already been operating for a while.
You are now in a position to scale up from the prototype. You have a clear idea of your market. You know the processes inside out. You have the design and business plan. You have secured a means of financing.
Continue what you have been doing up to this point, but bigger.
- Do you need additional employees? Great! You already have systems in place to train them.
- Do you need to increase production? Great! You have the data to scale production.
I think you get the point. In reality, you had already started the farm from the very first step. Now you are just connecting the dots. You have a strong foundation; grow from there.
Congratulations!
Tip: Confidence comes from competence, knowing that you are capable of doing what you are required to do. If you were to jump straight to step 12, chances are you would be overwhelmed and quit. Start small and grow from there.
Summary
I have outlined how to start a micro-farm business in 12 simple steps. While simple, they can be time-consuming.
This process can take several months, from the initial brainstorm session to the official start of your Micro-Farm.
However, don’t try to rush it. This foundation is necessary for the stable growth of the farm over time.
References
USDA. USDA Organic. USDA.gov. Accessed June 2021
GIDC. Services GIDC. Grenadaidc.com. Accessed June 2021
CCIC. CaribbeanCIC. Caribbeancic.org. Accessed June 2021