
I first learned how to make a crop plan a couple years ago in order to offer a weekly vegetable bundle to my micro farm customers.
Initially, I was overwhelmed by the various approaches to crop planning. However, everything became crystal clear after planting and successfully harvesting my first vegetable basket.
Today, I still use my original crop plan as a base but have simplified it considerably to make it suitable for use in container gardening.
In this article, I’ll share a simple process to create a crop plan and some reference data I’ve collected from my garden.
What Is A Crop Plan?
A crop plan is a simple tool designed to give growers a visual overview of their potential crop production throughout the year.
In its basic form, it can help schedule planting, but farmers can also develop it to assist with more advanced tasks such as budgeting, calculations for seed orders, and forecasting sales.
Importance Of Crop Planning
Crop Planning takes some of the guesswork out of food production. It allows us to make the most of available space at any given time.
In fact, the main objective of crop planning is to increase profit and productivity while lowering the resources used.
As gardeners, we can identify potential growth opportunities and have our desired crops ready to plant.
How To Make A Crop Plan (Step By Step)
The easiest way to make a crop plan is to plot the necessary information on a graph paper or spreadsheet.
This visual approach allows us to ensure that the entire garden is wholly planted out at any given time.
However, we must first collect the required information before plotting anything. So, let’s get started.
1. Collect Growing Information For Each Plant
To begin, you have to create a list of the plants you want to grow. Select vegetables and herbs you like to eat or usually use in the kitchen.
Then, gather the planting information for each crop on the list. Fill in the following details:
- Name Of The Plant
- Cultivar Or Variety
- Days To Germination
- Days To Transplant
- Days To Maturity/Harvest
- Length Of Harvest
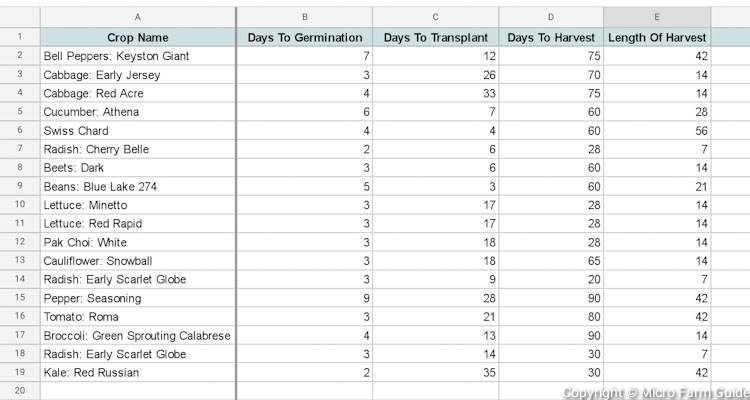
You can get this data on the seed package or online. Place this information in a simple table in your spreadsheet, as shown in the example below.
2. Determine How Many Of Each Vegetable You Need
Next, you need to figure out how many plants to grow. This can be based on your current grocery list or your available space.
For example, if you like to eat green salads during the week, your list might look something like this.
- 2 heads of cabbage
- 4 heads lettuce
- 4 cucumbers
- 2 sweet peppers.
- 1 bunch radishes
- 2 sticks of carrots.
- 2 Tomatoes
You can modify the list to suit your needs. Then, add a new column to your plant list to include your ideal quantities. This will give you an idea of how many plants you need to grow.
3. Create A Visual Crop Map
Once you have your list and planting information, you can plot it down on a grid using either graph paper or a spreadsheet.
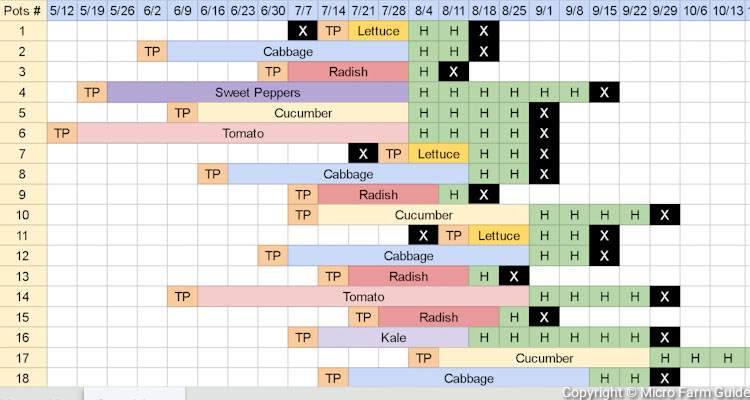
For simplicity, I usually plan in terms of weeks and round off my planting days accordingly. I also adjust the planting dates so that various crops will be ready around the same time.
Tip: You should start by plotting the date you wish to harvest the crop on the spreadsheet, then count backward to the transplant date.
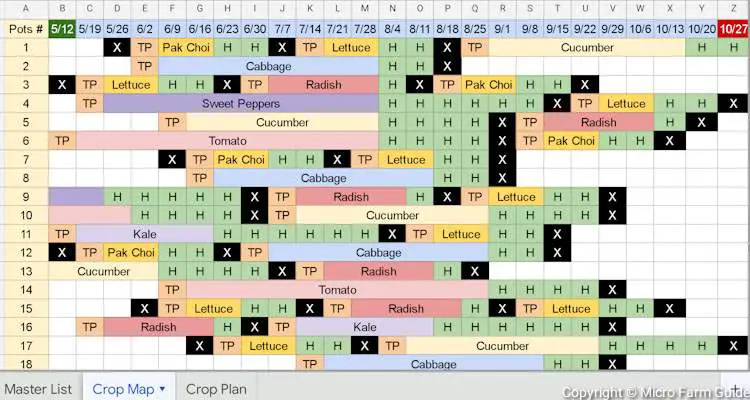
4. Use A Crop Map To Create A Succession Plan
Your Crop Map makes it easier to visualize what’s happening in the garden, allowing you to identify when specific pots or beds will be available throughout the growing season.
You can use the information in your plant list to fill in the “empty spaces” with a suitable vegetable. Remember, start from the harvest and work back to the transplant date.
In this example, I staggered the harvest dates of the lettuce to ensure we could harvest them weekly.
This visual also gives us a clear idea of when we must transplant the lettuce to the pots or beds, so we can order seedlings or plant seeds as needed.
We then have to use the planting information from each vegetable and continue until the entire growing season is covered.
5. Estimate The Seed Start Date For Each Crop
Now that you have completed your Succession Plan, it’s time to extract the various transplant and harvest dates, then start to develop the actual crop plan.
To begin, we need to determine the Seed Start Date. Calculate this by subtracting the Days To Transplant from the Transplant Date.
For this exercise, I will use data from my farm, where the average temperature throughout the year is about 86 °F.
| Crop Name | Days To Germination | Days To Transplant |
| Bell Peppers: Keyston Giant | 7 | 12 |
| Cabbage: Early Jersey | 3 | 26 |
| Cabbage: Red Acre | 4 | 33 |
| Cucumber: Athena | 6 | 7 |
| Swiss Chard | 4 | 4 |
| Radish: Cherry Belle | 2 | 6 |
| Beets: Dark | 3 | 6 |
| Lettuce: Minetto | 3 | 17 |
| Lettuce: Red Rapid | 3 | 17 |
| Pak Choi: White | 3 | 18 |
| Cauliflower: Snowball | 3 | 18 |
| Radish: Early Scarlet Globe | 3 | 9 |
| Pepper: Seasoning | 9 | 28 |
| Tomato: Roma | 3 | 21 |
| Broccoli: Green Sprouting Calabrese | 4 | 13 |
| Radish: Early Scarlet Globe | 3 | 14 |
| Kale: Red Russian | 2 | 35 |
You can use the information above in your plan, provided you have similar temperatures. The actual days will vary as the temperature fluctuates throughout the year, so ensure you keep records and make adjustments to your future plans as needed.
6. Assemble The Crop Plan
Now, you have all the information you need to create your crop plan. You can organize the table to suit your needs. However, I prefer to start with the harvest dates as in the table below.
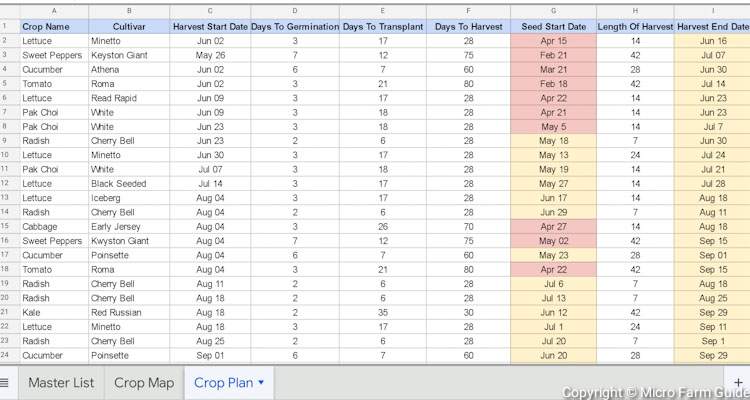
However, you can choose whichever date you intend to give priority. Remember, this is only a guide, so be prepared to adjust when necessary.
7. Transfer Information To Calendar (Optional)
Now that you have your crop plan, you can use it as is, or you take some time to transfer the information to a physical or digital calendar.
This will create a list of activities you must complete throughout the growing season and can send you reminders or notifications.
Additionally, you can add other tasks, such as fertilizer and pest management schedules. You can be as broad or detailed as you wish.
Final Thoughts
A crop plan is a valuable tool to help you maximize your gardening efforts. However, the accuracy of the plan depends on many factors, some of which are beyond our control.
As a result, you must be flexible and keep detailed records, especially those that deviate from the plan. You can then use this information to update your plan for the following year.
That said, the crop plan cannot miraculously transform your garden. Still, it can help you focus on completing important tasks on time.
Ultimately, the onus is on you to make the best of this fantastic little helper; gather the necessary information, schedule your planting, then follow your plan for a bountiful harvest. Enjoy!
Related Questions
What Is Crop Planning?
Crop Planning is creating a detailed schedule outlining where, when, and which plants you intend to grow. It considers various factors, such as the plant’s needs and environmental conditions.
What Are Multiple Cropping Methods?
The two main types of Multi Cropping Methods are succession cropping and intercropping, which include the production of 2 or more types of crops in the same area within the same calendar year.
What Is Meant By Crop Rotation?
Crop rotation is the planned, sequential growing of different crops within the same growing area over time. For example, you can grow Beans, then Lettuce, followed by Corn, and finally Carrots,
References
PennState Extension. Crop Planning. extension.psu.edu. Accessed May 2023